Burp Suite Tutorial: Intercepting, Modifying & Scanning HTTP Traffic
Ofer Hakimi
January 27, 2025
Updated
September 8, 2025
9
min to read
What Is Burp Suite?
Burp Suite is a web application security testing platform. It provides manual and automated tools to help cybersecurity professionals and developers identify vulnerabilities in web applications.
Developed by PortSwigger, Burp Suite integrates into the testing process, offering a suite of modular tools for tasks such as scanning, crawling, and analysis. This platform is useful for both manual and automated testing, offering flexibility and integration capabilities. It supports numerous extensions, which allow users to tailor the suite to meet project needs.
Security testers often rely on Burp Suite for its proxy features that enable the intercepting, inspecting, and altering of web traffic. The ease of use and step-by-step guidance also make it suitable for beginners.
This is part of a series of articles about Burp Suite
Key Features of Burp Suite
Here are some of the most important features available in Burp Suite:
Intercepting proxy: Allows users to capture and modify web traffic between the browser and target application. Useful for understanding how a web application communicates, helping inspect requests and responses in detail. Enables the manual manipulation of HTTP messages, allowing testers to probe for vulnerabilities like SQL injection or cross-site scripting (XSS).
Web vulnerability scanner: Can automatically detect common web application vulnerabilities, scanning websites for issues such as cross-site scripting (XSS), SQL injection, and insecure configurations. Users can adjust the depth and scope of the scan according to the needs of the testing environment.
Repeater: Used for manually reissuing individual HTTP requests with modified parameters. This is useful for testing the resilience of web applications against tampering. Users can experiment with different inputs to see how the server responds, making it easier to identify hidden security flaws or unexpected behavior.
Intruder: Automates customized attacks on web applications, allowing teams to perform brute force attacks, fuzzing, and parameter manipulation. Users can set up payloads and define rules to test a range of inputs, helping discover vulnerabilities that may not be apparent through manual testing alone.
Extensibility: Supports a rich ecosystem of plugins and extensions via the BApp Store. These extensions, which can be developed using the Burp Extender API, enable users to add new functionalities or integrate Burp Suite with other tools.
Scanner dashboard and reporting: Provides a real-time overview of all active and completed scans. The dashboard tracks progress, highlights discovered vulnerabilities, and offers detailed information on each issue, including severity levels and remediation advice. Burp Suite also generates customizable reports, making it easier to communicate findings to stakeholders.
Collaboration features: Available in Burp Suite Enterprise and Professional editions, these features allow team members to share scan data, configurations, and findings. This is useful for larger teams working on complex projects, ensuring that everyone has access to up-to-date information.
Tutorial: Getting Started with Burp Suite
Here’s a walkthrough of how to set up and start using Burp Suite. These instructions are adapted from the official documentation.
Step 1: Downloading and Installing Burp Suite
To begin, you’ll need to have the latest version of Burp Suite:
Download Burp Suite: You can choose between the Professional Edition and the Community Edition, depending on your needs. Visit the official PortSwigger website to access the download links.
Install Burp Suite: After downloading the installer, run it to install Burp Suite on your system. Follow the on-screen instructions to complete the installation. If you’re using the Professional Edition, you’ll be prompted to enter your license key. For first-time users, you can skip any project file or configuration setup by clicking Next, followed by Start Burp.
Step 2: Intercepting HTTP Traffic
To start using Burp Proxy to intercept traffic:
Launch the Burp browser: Navigate to the Proxy tab in Burp Suite, then click on Intercept and set the intercept toggle to Intercept on. Then, click Open Browser to launch Burp's preconfigured browser. Arrange your windows so that both Burp Suite and the browser are visible.
Intercept a request: In the Burp browser, try opening a website. You’ll notice that the page doesn’t load immediately because Burp Proxy has intercepted the HTTP request. This intercepted request is displayed under the Intercept tab under Proxy, allowing you to check it before forwarding it to the server.
Forward the request: Click on Forward to send the intercepted request to the server. You may need to forward multiple requests before the page fully loads in Burp's browser.
Switch off interception: After examining the necessary requests, you can switch off interception by toggling Intercept off in the Proxy tab. This allows subsequent traffic to pass through Burp Proxy without interruption.
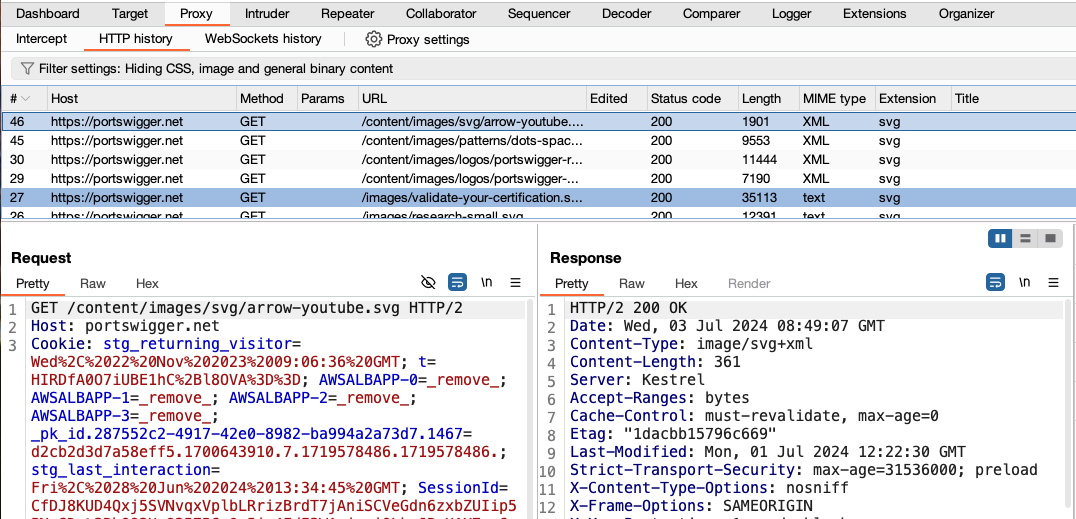
Access the HTTP history: To review all HTTP traffic, navigate to the HTTP history tab under Proxy. Here, you can see a detailed log of all HTTP requests and responses that have passed through Burp Proxy. Clicking on any entry will display the raw HTTP data, which is useful for understanding how the web application interacts with the server.
Step 3: Modifying and Setting Target Scope for HTTP Requests
To modify the intercepted HTTP requests:
Visit the vulnerable website: Before modifying requests, make sure interception is switched off in Burp. Then, use Burp’s browser to visit a deliberately vulnerable website provided by PortSwigger.
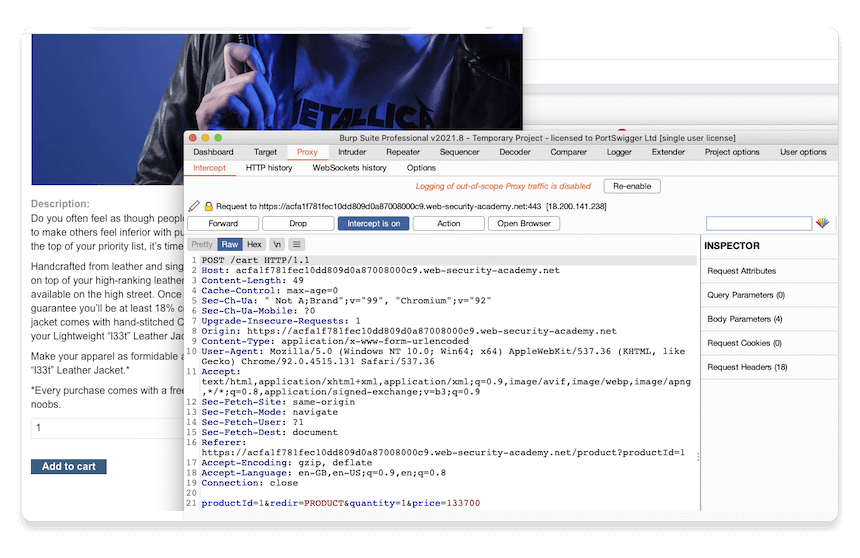
Intercept a request: Switch interception back on, and interact with the website (e.g., adding an item to a shopping cart). Burp Proxy will intercept the request, allowing you to study the parameters involved.
Modify the request: Examine the intercepted request and locate a parameter of interest (e.g., the price of an item). Manually change the value of this parameter to test how the server responds to unexpected inputs. Once modified, click Forward to send the altered request to the server. To send multiple requests, click Forward all.
Exploit the identified vulnerability: After forwarding the modified request, check the website in the Burp browser to see if the modification was successful. For example, you might find that an item in your shopping cart now has a drastically reduced price, demonstrating a potential security vulnerability.
Tzvika Shneider
CEO, Pynt
Tzvika Shneider is a 20-year software Security industry leader with a
robust background in product and software management.
Tips from the expert
Use session handling rules for complex authentication flows: For applications with complex authentication mechanisms, such as
multi-factor authentication or single sign-on (SSO), configure session
handling rules to manage tokens and cookies automatically. This
ensures Burp Suite maintains the session and can scan protected parts
of the application without manual intervention.
Use the Burp Intruder's cluster bomb attack type:
When dealing with multi-step processes or parameters that need
simultaneous manipulation, use the cluster bomb attack type. It allows
you to test combinations of payloads across different positions, which
can reveal vulnerabilities only exposed through specific parameter
interactions.
Leverage the Burp Suite API for automation: Use Burp
Suite's REST API to integrate with CI/CD pipelines, enabling automated
security testing during the software development lifecycle. This helps
catch vulnerabilities early, ensuring security is embedded into the
development process.
Use the Logger++ extension for detailed request/response
logging: The default HTTP history may not capture all the nuances of each
request. Logger++ provides more granular logging, allowing you to see
exact timings, headers, and responses, which is useful for
troubleshooting and analyzing complex interactions.
Use Burp's sequencer tool for token analysis: Use the
sequencer tool to analyze the randomness of tokens or session IDs.
This can help identify weaknesses in the application's session
management, where predictable tokens could lead to session hijacking
or replay attacks.
To set the target scope for testing URLs with Burp Suite:
Launch the Burp browser: Start by opening Burp’s browser and visiting a specific URL, such as a testing site provided by PortSwigger.
Browse the target site: Navigate through various pages on the target site to generate HTTP traffic that Burp can capture and analyze.
Review the HTTP history: Go to the Proxy tab, then the HTTP history tab to review the captured requests. This history will include traffic from both the target site and any third-party services the browser interacted with, such as analytics tools.
Add the target site to your scope: In the Site map tab under Target, locate the target site in the left-hand panel. Right-click on the site and select Add to scope. Confirm by clicking Yes when prompted to exclude out-of-scope traffic.
Filter the HTTP history: Return to the HTTP history tab and use the display filter to show only in-scope items. This filtered view simplifies your analysis by focusing only on traffic from the target site, making it easier to identify potential vulnerabilities.
You can use Burp Repeater to repeatedly send a given request:
Identify a relevant request: In Burp’s HTTP history, find a request that warrants further investigation, such as one involving a product page. Right-click on this request and select Send to Repeater.
Modify and resend the request: Go to the Repeater tab, where the selected request is displayed. Modify parameters within the request, such as the productId, and click Send to observe how the server responds to each variation.
Analyze the response: By sending different inputs, you can test how the server handles unexpected data. For example, sending a non-integer value instead of an expected numeric ID might trigger an error, revealing information about the server's configuration and potential vulnerabilities.
Step 5: Running a Vulnerability Scan
To enable an automated scan:
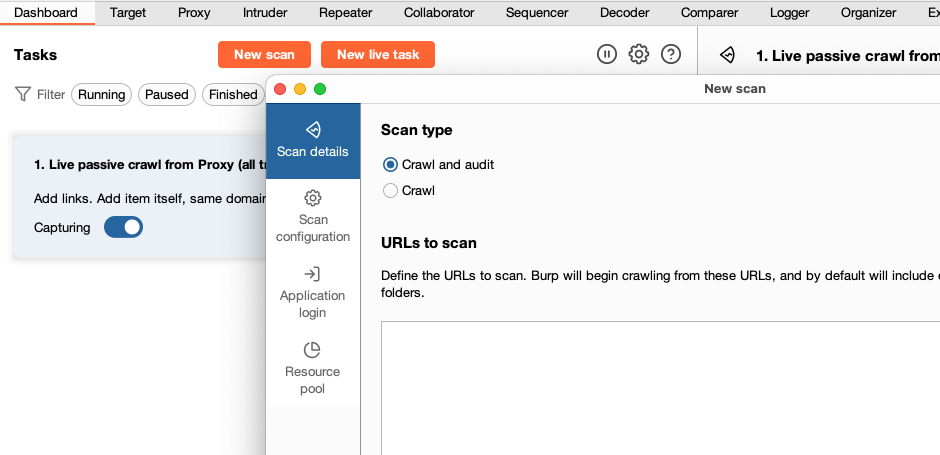
Open the scan launcher: Navigate to the Dashboard tab in Burp Suite and click New scan to open the scan launcher.
Enter the target URL: In the scan launcher, enter the URL of the site you wish to scan. Ensure all other settings remain at their default values unless specific adjustments are required.
Configure the scan: Select the Lightweight scan mode under Scan configuration. This mode provides a quick overview of the target site by running a scan for a maximum of 15 minutes.
Launch the scan: Click OK to begin the scan. Burp Scanner will start by crawling the site, mapping out its structure and content.
Monitor the scan: While the scan runs, you can monitor its progress in the Dashboard. The Site map tab under Target will also update in real time as the scan discovers new content.
Review identified issues: After the scan completes, review any identified vulnerabilities by selecting the scan task from the Dashboard and examining the Issues tab. Each issue includes detailed information and evidence, helping you understand and address the security risks on the target site.
Pynt: Ultimate Burp Suite Alternative for API Security Testing
Pynt vs. Burp Suite:
Pynt offers automated, API-specific security testing that integrates seamlessly into CI/CD pipelines, ensuring continuous testing with every API or code change. Unlike Burp Suite, which excels in manual web application testing, Pynt focuses on context-aware API vulnerability detection and scales effortlessly across large environments. Pynt also automates API discovery and integrates with tools like Postman and ReadyAPI for real-time security testing.
Added Value of Pynt’s Integration with Burp Suite:
Integrating Pynt with Burp Suite automates the generation of API-specific security tests, enhancing Burp’s capabilities. Pynt’s continuous, automated testing in the CI/CD pipeline complements Burp’s manual testing, filling gaps in API discovery and helping to detect API-specific threats like BOLA. It offers a more complete, hands-off API security solution.
Watch how to expose API Vulnerabilities with Pynt + Burp
Watch the video below to learn how to run Pynt's API security testing solution with Burp suite. Pynt generates automated security tests based on your Burp recordings. Simply input your Burp HAR recording files into Pynt, and we will generate automated security tests in minutes. Give it a try here


.svg)


